Quick-start Apache Spark Environment Using Docker Containers
Are you learning or experimenting with Apache Spark? Do you want to quickly use Spark with a Jupyter iPython Notebook and Pyspark, but don’t want to go through a lot of complicated steps to install and configure your computer? Are you in the same position as many of my Metis classmates: you have a Linux computer and are struggling to install Spark? One option that allows you to get started quickly with writing Python code for Apache Spark is using Docker containers. Additionally, using this approach will work almost the same on Mac, Windows, and Linux.
Curious how? Let me show you!
Wait a second! What exactly is Docker?
According to the official Docker website:
“Docker containers wrap a piece of software in a complete filesystem that contains everything needed to run: code, runtime, system tools, system libraries – anything that can be installed on a server. This guarantees that the software will always run the same, regardless of its environment.”
It also helps to understand how Docker “containers” relate (somewhat imperfectly) to shipping containers.
In this tutorial, we’ll take advantage of Docker’s ability to package a complete filesystem that contains everything needed to run. Specifically, everything needed to run Apache Spark. You’ll also be able to use this to run Apache Spark regardless of the environment (i.e., operating system). That means you’ll be able to generally follow the same steps on your local Linux/Mac/Windows machine as you will on a cloud virtual machine (e.g., AWS EC2 instance). Pretty neat, huh?
Install Docker
First you’ll need to install Docker. Follow the instructions in the install / get started links for your particular operating system:
- Mac: https://docs.docker.com/docker-for-mac/
- Windows: https://docs.docker.com/docker-for-windows/
- Linux: https://docs.docker.com/engine/getstarted/
Note: On Linux, you will get a
Can't connect to docker daemon.error if you don’t usesudobefore anydockercommands. So you don’t have tosudoeach time you run adockercommand, I highly recommend you add your user (ubuntuin the example below) to thedockeruser group. See “Create a Docker group” for more info.
Make sure to log out from your Linux user and log back in again before trying
dockerwithoutsudo.
Run the Docker container
We’ll use the jupyter/pyspark-notebook Docker image. The great thing about this image is it includes:
- Apache Spark
- Jupyter Notebook
- Miniconda with Python 2.7.x and 3.x environments
- Pre-installed versions of pyspark, pandas, matplotlib, scipy, seaborn, and scikit-learn
- Additional goodies
Create a new folder somewhere on your computer. You’ll store the Jupyter notebooks you create and other Python code to interact with Spark in this folder. I created my folder in my home directory as shown below, but you should be able to create the folder almost anywhere (although I would avoid any directories that require elevated permissions).
1
2
3
4
5
6
7
8
$ cd ~
$ pwd
/Users/maxmelnick/apps

$ mkdir spark-docker && cd $_

$ pwd
/Users/maxmelnick/apps/spark-docker
To run the container, all you need to do is execute the following:
1
$ docker run -d -p 8888:8888 -v $PWD:/home/jovyan/work --name spark jupyter/pyspark-notebook
What’s going on when we run that command?
The -d runs the container in the background.
The -p 8888:8888 makes the container’s port 8888 accessible to the host (i.e., your local computer) on port 8888. This will allow us to connect to the Jupyter Notebook server since it listens on port 8888.
The -v $PWD:/home/jovyan/work allows us to map our spark-docker folder (which should be our current directory - $PWD) to the container’s /home/joyvan/work working directory (i.e., the directory the Jupyter notebook will run from). This makes it so notebooks we create are accessible in our spark-docker folder on our local computer. It also allows us to make additional files such as data sources (e.g., CSV, Excel) accessible to our Jupyter notebooks.
The --name spark gives the container the name spark, which allows us to refer to the container by name instead of ID in the future.
The final part of the command, jupyter/pyspark-notebook tells Docker we want to run the container from the jupyter/pyspark-notebook image.
For more information about the docker run command, check out the Docker docs.
Test Spark in a Jupyter notebook using Pyspark
The jupyter/pyspark-notebook image automatically starts a Jupyter Notebook server.
Open a browser to http://localhost:8888 and you will see the Jupyter home page.
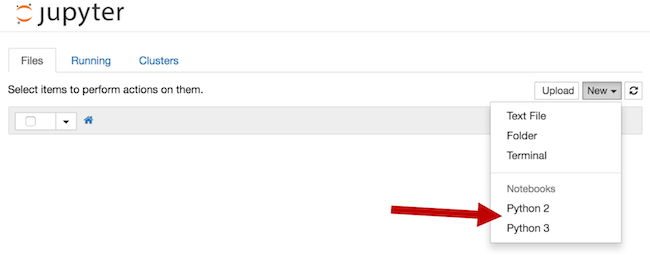
Once you have the Jupyter home page open, create a new Jupyter notebook using either Python 2 or Python 3.
In the first cell, run the following code. The result should be five integers randomly sampled from 0-999, but not necessarily the same as what’s below.
1
2
3
4
5
6
import pyspark
sc = pyspark.SparkContext('local[*]')

# do something to prove it works
rdd = sc.parallelize(range(1000))
rdd.takeSample(False, 5)
1
[841, 378, 942, 629, 399] # Output
That’s it! Now you can start learning and experimenting with Spark!
Starting and stopping the Docker container
Note: these commands assume you used
sparkas the--namewhen you executed thedocker runcommand above. If you used a different--name, substitue that forsparkin the commands below.
If you want to stop the Docker container from running in the background:
1
$ docker stop spark
To start the Docker container again:
1
$ docker start spark
To remove the Docker container altogether:
1
$ docker rm spark
See the Docker docs for more information on these and more Docker commands.
An alternative approach on Mac
Using the Docker jupyter/pyspark-notebook image enables a cross-platform (Mac, Windows, and Linux) way to quickly get started with Spark code in Python. If you have a Mac and don’t want to bother with Docker, another option to quickly get started with Spark is using Homebrew and Find spark. Check out the Find spark documentation for more details.
Conclusion
As you can see, Docker allows you to quickly get started using Apache Spark in a Jupyter iPython Notebook, regardless of what O/S you’re running. My hope is that you can use this approach to spend less time trying to install and configure Spark, and more time learning and experimenting with it. Best of luck!